
Lately, I’ve been on a mission to turn all sorts of forgotten treasures into lights — old tripods, school bus stop signs, salvaged fixtures people have sent me in the mail. But my favorite project so far has been turning a few of my beat-up old cameras into working lamps.
This isn’t actually my first time making a camera lamp. The very first one I ever made was back in 2012 with my dad — a little DIY experiment we worked on just before I moved to New York City. It was quirky, a little wobbly, and I’ve been obsessed with lamp-making (and camera-hoarding) ever since.
Over the years, I’ve collected so many cameras — Polaroids, film boxes, early video cameras — that it started to feel wrong keeping them hidden in a closet. Cameras have seen so many milestones in people’s lives; it only feels right to give them a second life shining a little light of their own.
So, I pulled out my stash of J.B. Weld, some lamp parts, and a dash of creative chaos — and brought these cameras back to life! Below is a blog post with instructions on how to make a camera lamp that I wrote a while ago… and just updated with some new images + thoughts on the process! If you want the video version of this tutorial check out the bottom of this post.

How to Make the Upcycled Camera Lamp:

- Old Cameras (I used cameras that are unusable as cameras due to damage, rot, etc.)
- Lamp Kit
- Lamp Pipe
- JB Industro Cold Weld
- Spray Paint for Lamp Pipe
- Tape
- Clamps or something to hold the camera steady while the cold weld sets
- Something with which to spread the cold weld
***A few of the links in this post are affiliate links which means I receive a small commission if you buy any paint, but prices do not change on your end!
Step 1: Camera placement
The first thing you need to do is figure out how to place the cameras you are turning into a lamp. I like to balance the shapes and colors of the cameras themselves. You can either stack the cameras by themselves or use a base of some sort!

Step 2:
Next, mix the cold weld. (1 part red tube, 1 part black tube.) This stuff is incredible. When you let the JB Cold Weld cure properly, it is pretty much like… welding! I’ve used it for many different projects and it is the best superglue/epoxy ever. If you choose to make a camera lamp with this stuff, those cameras won’t be going anywhere.

Step 3: Spread the JB Weld on the cameras where they’ll touch + weld the necessary hardware.
Sometimes this will be on the shoe mount… sometimes on the camera body itself. You can always wipe away the excess that seeps out. Let it all dry and cure and then move on to welding the lamp pipe to the back of the lamp. I secure this step with a bit of tape, and then it hardens pretty quickly.


Step 4: Choose your hardware
You can buy a full lamp kit at the hardware store and use that, or you can scrounge up some patina’d sockets and hardware. If I use old sockets, I always replace the insides with new insulators and actual lamp hardware. I LOVE this shop Snake Head Vintage on Ebay for parts, I’ve ordered from them for almost 10 years!

Step 5: Assemble your lamp!
Time to build your lamp. Wire the cord to the socket, thread it through the pipe, add a plug and you’re good to go! These are great instructions on wiring a lamp if you are unfamiliar.

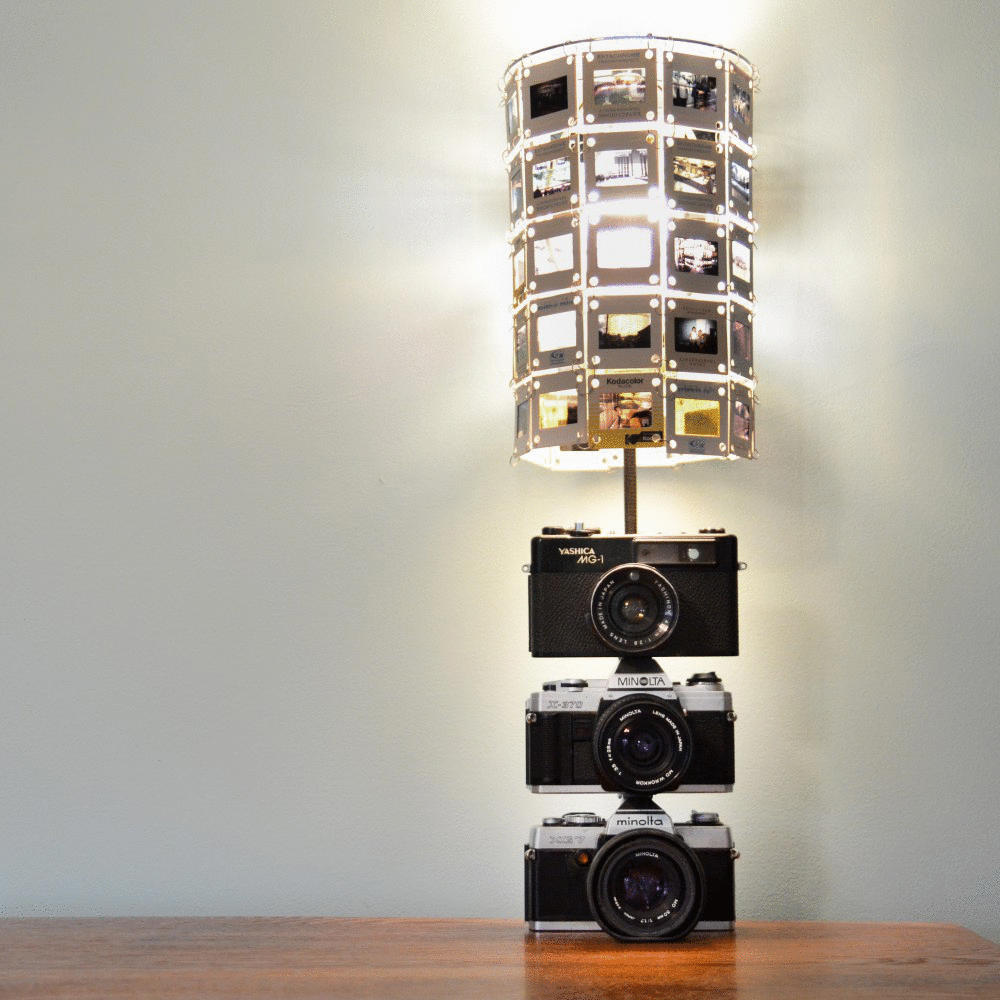
To make the color slide lamp shade:
- 10mm Jump Rings (Or bigger)
- Pliers (Needle Nose or Jewelry Pliers)
- A small hole punch (I use a leather punch)
- Top of a Lamp Shade (I got mine at a thrift shop)
Step 1:
First you need to punch holes in the four corners of all of your slides. MAKE SURE that all of your holes are in the same places on the slides so that the slides will hang evenly. I tried to make this lamp shade over a year ago and I just poked holes in the corners of the slides willy-nilly. Do not do that. Take your hole punch and punch in the same spot over and over. 🙂 Then take your jump rings and piece all of the slides together.

Step 2:
Connect all of the holes, testing it against the top of your lamp shade as you go. Link them to the lamp shade ring with additional jump rings.


And now I can sleep in peace knowing that these cameras are getting the love they deserve. 😉